Showing posts with label my sustainable body. Show all posts

Sunday, September 16, 2012

new horizons, new toothpaste

I abandoned you this summer, dear blog, didn't I?

Rather than being too busy to think, I've had plenty on my mind and plenty to say. Plenty of moments, lost in thoughts, lost in concerns, lost and looking for an outlet. Alas, it hasn't really been fit for public consumption. Rightly so.

Anyway, it is time for some items of note to be published...
I have moved. I, alone. Without Able-Bodied Boy, my friend, my roommate, my love for many years. I will not go into any of that personal stuff here, but we remain good friends.
I have moved. Out of the middle of nowhere and into the Land Near Work. A Land where I can bike to work and walk Bella through neighborhoods.

A Land where chickens do not roam. Able-Bodied Boy will retain care and consumption of eggs. And even has plans to add to the flock! I'm so excited to see that project flourish and continue on :)
What an adventure, eh? Will I try a garden on my little porch (would it even survive a shady north face -- it's south-facing but I'm still not sure I can make anything grow)? How will Bella react to the new surroundings, poor stressed creature?  What frugal and healthy foods will I cook for myself? How will I handle this new 3-mile biking commute? Will I finally lose that weight, through long walks with Bella? How will I adjust to life on my own?

In other excitement (ok, only I find this exciting...), I have switched to baking soda for toothpaste! A simple mix of baking soda and hydrogen peroxide and peppermint oil. It took a bit of getting used to, but I'm diggin' it! Next up, deodorant :) I'll post more on all that later!

Ok, back to serious matters... Thank to all of you who have been so supportive during this transition. (to the apartment, not to baking soda toothpaste. i doubt anyone really noticed that....)  Some things just can't be done without friends and family and well-connected coworkers. Phone calls. Emails. Muscles lifting boxes. Knowing a guy. Shoulders to cry on. Encouragement as life transitions to new things. Toaster ovens. (it's important to have toast!) These are the things that futures are made of....


Will you tell me about the little things in your life? I've seem to run out.

Much Love,
Able-Bodied Girl


Thursday, March 15, 2012

smokin', slicin', and pricin' bacon

So, now you have a salty slab o' meat, right?


Smoke it!
There are plenty of smoker boxes on the market for all sorts of grills, as well as a variety of types of wood chips. There are also stand-alone smokers specifically for smoking, but I don't think we're quite that serious about our smoking just yet.

So, here are the basics of smoking your belly:
  • Get the chips wet
  • Heat them on high heat until they begin smoking
  • Turn down your heat until you can maintain a 200deg covered grill temperature
  • Put your pork belly in (not directly over any heat source)
  • When the belly reaches 150deg internal temp, it's done! (approx 3 hours)
We have a gas grill, with three long rows of racks and burners across the grill. We put the smoker box on top of the back burner (rack removed), and only used that burner during the process. On high, the grill got up enough heat to get the chips burning, and on low the grill was able to maintain 200deg. Perfecto! We placed the meat on a cool secondary rack (one that hadn't been in the grill during the warm-up process) to avoid any grill marks or too much heat directly on the meat. That secondary rack (which was really a fish grill rack, scrubbed really well first) went onto the front of the grill, where the burners had been off all along. We checked on the temperature after a while, and right around the 3 hour mark, it had reached 150! (Ok, and by "we" in this entire paragraph, I really mean Able Bodied Boy :))

We let it cool down a bit, then rinsed the salts off, then stuck it in the fridge to harden up a bit for slicing. We might have licked our fingers.


Slice it!
Of all the aspects of making bacon, this was probably my biggest worry. I know someone with a slicer... someone that lives 500 miles away :-P So we were going to need to find a slicer, find another slicing method, or hand-slice the meat.

Luckily, I happened to be at a friend's house, touring through their recent renovations, when we stopped to chat. Lo and behold, there was a slicer at our feet! I immediately claimed it (thank goodness they are nice people and understand my quirks), with promises to return it.

If you don't know how to use a slicer, for the love of all things fingered, look it up! Be safe; these are dangerous machines. The only good thing about how wonderfully sharp they are (besides cutting, you know, meats and cheeses and such) is that any body parts you lose to it will probably have a clean cut and can be taken to the ER with you... Sorry if that grosses you out, but seriously these machines are dangerous.

Anyway, we picked a thickness we liked and it only took a few minutes to create 6 lovely piles of a half pound of bacon.

If you don't have access to a slicer, just remember that the world won't end if the slices aren't perfect. And use a sharp knife. And you could probably briefly freeze the meat to make it a little more solid.

We found that one end of our belly was rather fattier than we would generally like our bacon, but I don't fault the pork shop for that. First, I imagine they take the better cuts of belly for their bacon. Secondly, there are two directions we could have sliced the bacon in... long side or short side. I told Able Bodied Boy to use the short end, so we'd have sandwich-length pieces of bacon, and more slices for dividing amongst our 6 piles. If we had cut on the long side, each piece would have had one end fattier than the other. *shrug* I divided the fattier pieces amongst the piles. We can always save the bacon drippings for future cooking. If you were looking for healthy bacon... move along :)


Price it!
This may vary for your area/sources, but here's what we were working with...
  • $7.50:  3.5 lbs Pork Belly  
  • $0.83:  .5 lbs Kosher Salt ($5 for 3lbs)
  • $2.40:  4oz pure maple syrup ($.60/oz)
  • $1.00:  a handful of wood chips
  • $3.91:  ($11.73 total for 3 lbs of bacon)
Granted, this math doesn't factor in the actual smoker box we invested in (and have used several times), or the time and energy. But the local pork shop sells their bacon for around $4.50/lb and, provided they don't use curing salts, we feel like it isn't any more/less economical to buy their pork belly versus buying their bacon.

But for those who haven't paid attention lately, bacon is up between $5 and $6 per pound at the grocery, and don't forget that they've pumped it with extra goodies...


Up next on my list of home-makins... dairy products. Are there any products that you're curious about how it's made, and if it can be done fresh at home?

Much Love,
Able-Bodied Girl


Tuesday, March 6, 2012

w/mo2h #5: curin' bacon

Ok, so now that you have your pork belly...

What do I need for curing?
  • Salt (Kosher salt is best)
  • Flavorings (optional)
    • Maple syrup (the real stuff, for the love of nature!)
    • Brown Sugar
    • Black Pepper
    • Other, as desired
  • A non-metalic covered curing vessel
    • A rig for keeping the belly out of it's own liquid. We used a large tupperware, with two small lids underneath the belly to keep it out of the pool.
    • Or, you can just use gallon-sized baggies (cut the belly in half if necessary... two bags, two different cures?). They will retain the liquid around the belly and possibly not get you as dry of a cure, but you're used to water-logged store bacon anyway (and you could drain the bag daily!). Be sure to double-bag to prevent contamination.
  • A spot in the fridge to keep it cold (and safe!)


Ok, let's get curing!
  • You do NOT need to remove the skin of the belly.
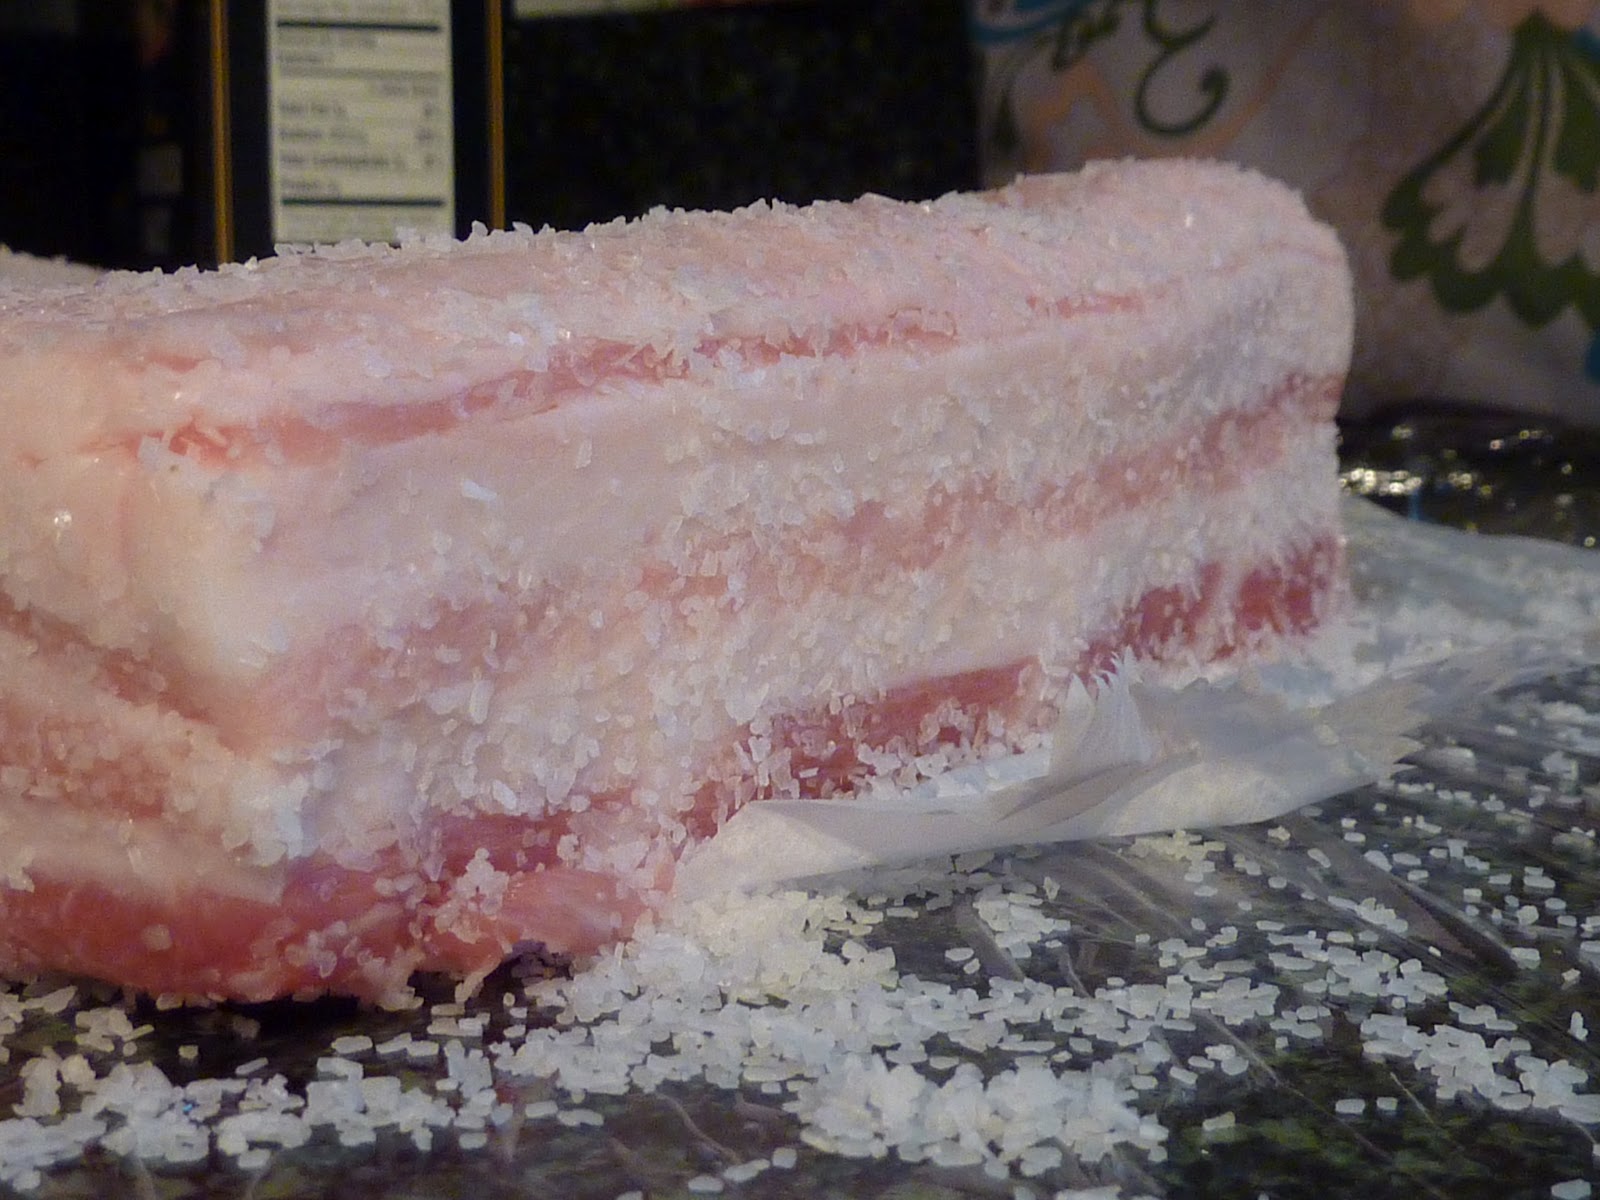
  • On a VERY CLEAN surface, rub both sides of the belly in a coat of salt. This is about a quarter-cup total for both sides. It doesn't need to cake, just coat. See photo above.
  • Rub both sides with your flavoring, a quarter-cup total. Brown sugar? Maple Syrup? Cracked Black Pepper? Your call!
  • Place in your curing vessel.
  • Daily, for one week:
    • Drain the liquid, if necessary
    • Add more salt to coat each side (1-2 Tablespoons total)
    • Flip over


Next up, smoking and slicing!


The weather has been great lately for doing a little winter pruning (I tackled our blackberries last weekend!). Have you been doing any outdoor projects?

Much Love,
Able-Bodied Girl


Sunday, March 4, 2012

w/mo2h #5: makin' bacon

Yup, you got that right.

We are making bacon. And it's super easy to do, from what we are finding.

Now, this was inspired by three things. First and foremost, the blogging goddess Crunchy Chicken and her post last month about her first bacon phase. Second and crucially, the fact that we have a full-service pork store just around the corner from our house, where all manner of fresh pork product is sold seasonally from September to April. Lastly and gratefully, Able-Bodied Boy's willingness to buy a smoker box for our gas grill (I swear I didn't bully him into it!).


How do you make bacon? The basics are as follows:

  • Obtain pork belly
  • Cure pork belly (let it sit with salt and flavorings like sweetness or spices on it) for one week
  • Smoke until the internal temperature reaches 150F
Seriously. That's it.


Why is this better than buying it from the store?

  • Store-bought bacon has evil additions.
    • Extra water, so that you are paying for more liquid than actual meat
    • Preservatives, namely sodium nitrite (see safety discussion below)
  • The source of the pork is unknown. We've all heard the horror stories about commercial farms: the feed, the anti-biotics, the conditions, etc.
  • Ultimate customized bacon flavors!

Is it safe to make your own bacon?

Yes, just as safe as you bringing home and cooking any other meat product: if you are mindful of cleanliness,  food-handling precautions, and safe cooking temperatures, than you are perfectly safe.

The FDA allows sodium nitrite to be used in the curing of meats. Sodium Nitrite helps in the prevention of botulism and keeps the meat a nice pink color. But it also, when heated, can form nitrosamines when heated. Nitrosamines are a carcinogen in lab testing. Now, there are some other products that can help prevent the nitrosamines from being created, so they pump ascorbic acid or erythorbic acid to help prevent that.  source

Yum.

I don't know about you, but I don't want to use those products. I'm not selling my bacon and I trust my methods. So, sodium nitrite (aka pink salts, aka curing salt, aka Prague Powder) is not being invited to this party.


Where am I going to find a pork belly from a good source?

This may take a bit of leg-work, but here are some tips:
  • Google maps: sometimes just entering "pork store" will yield you some options
  • Website listings: try localharvest.org or see if your local area has a website with area farm/market information. For the Philadelphia and South Jersey areas, I found farmtocity.org and slowfood.cape-may.net
  • Farmer's Markets: just because your farmer's market doesn't have a pork vendor doesn't mean they don't exist. Ask around. Farmers know farmers. Farmers often don't bring with them what is too difficult to transport (say, heavy coolers full of meats and ice) if they don't reliably sell.
  • CSA's: same as the farmer's markets. Many CSA's have relationships with local dairy/meat farms and they may have a good contact for you to call
  • Know a local friend who lives around the corner from a pork store, or works in a butcher shop *winkwink*


I haz pork belly! What now??

Patiently wait for the next installment, when we start the curing process!


What's going on in your kitchen? Or, with this beautiful weather, have you made your way outdoors to the garden?

Much Love,
Able-Bodied Girl


Thursday, November 17, 2011

hair drama

As I hinted at in the last post, there was a bit of hair amusement several weeks ago...

We all know I've gone "No 'Poo" (aka, no shampoo or conditioner) since March. Which hasn't been too bad. But, on occassion, I have issues with flakes and I've been really determined to solve that problem. So what did I do?

I googled it. (The problem; not my hair.) One of the main suggestions I had read in the past was using Apple Cider Vinegar, which, oddly enough, I was already using. I was sure to let it sit on my scalp longer, and with more vigourous massaging, but there were still weeks when I had flakes. Sometimes terribly. Sometimes just a bit.

So, a bit more research for better solutions, and I came across several references to Tea Tree Oil and/or Lavendar Oil, and another that suggested Hydrogen Peroxide to disinfect the scalp. Now, I don't have psoriasis as far as I know, just a dry scalp, but I thought it couldn't hurt. We also had a full ounce of Tea Tree in the house (that doesn't sound like a lot, but it is quite a bit for a single bottle of an essential oil!), so on a Sunday, I marched my butt into the shower with a new blend of ACV/h2o2 and Tea Tree. I started by washing my scalp vigourously with the h2o2.

Now, I can't find my Tea Tree source now, but I SWEAR I did it as I read to. And did NOT (until trying to find that article now) read all the other articles about using a 5% solution with the Tea Tree...

So I doused my head in 1/2 ounce of pure Tea Tree oil.

If that doesn't phase you, you've never worked with Tea Tree before. I knew what I was getting into, but I have a pretty thick skin and was fairly desperate, so I just did it. I poured capful by capful onto different parts of my wet head. Then wrapped my head in a towel and let the burn begin.

And it did burn. Not painfully. But a heat. And later, when I opened the towel a bit, I could tell that it really was "burning" off the extra derma. So, ok, not so bad, doing the job... right?

Here's the other thing about Tea Tree: it stinks, in high doses. So I stunk while it sat there on my head all afternooon, and evening, and night.  In the morning, I figured I'd just wash it out and be done with it. And by that time I was used to the smell.

So I washed. And washed. And washed again. I doused my head in the rest of the ACV/h2o2 so many times that, when I finally used the Baking Soda rinse, my head LITERALLY EXPLODED into trillions of middle-school volcano bubbles.

And my head still stunk.

No problem, I sit in the corner cubicle, away from everyone. I'd joke with my coworkers and tell them to stay away from my stench and endure that for another day or so. Until I got to work and remembered I had a dentist appointment. You know, that thing where you lay in a chair and someone hovers over your head for 30 minutes?? Oh dear god the drama!!

Lucky for me, it was a new dentist for me. So my first thought was, well, this will be my ONLY visit here!!. But when I arrived and met the dentist, he was a nice elderly man in a surgeons mask, so I figured he would either not smell it or be too polite to say anything, and he was the only one who came near me. So, whew to that! The smell faded after another day.

In any case, the Tea Tree did burn off the derma, but didn't prevent new dry skin from piling up in my long hair. So I guess it is good for a "reset button" sort of thing, but I would recommend starting it on a Friday night and plan to have a weekend ALONE.

Good news, I did find a solution. A very simple solution... and one that works amazingly well!

Drink. More. Water.

Swear to god, I've improved my water intake this week and I haven't had much of a problem at all with my scalp. And come to think of it, my dry scalp became more of a problem again when I stopped working out (and extra water for that) and during the heat of the summer when I avoided the outdoors (and, again, didn't feel the urge to drink while in the A/C).

So. Lesson Learned: Don't stink it up. Just drink it up.


Any amusing stories of big personal failures to share? I can't be the only one!?!

Much Love,
Able-Bodied Girl


Monday, November 7, 2011

novemb-a-what/personal hygi-nx

Holy crap, it's the holiday season.

I'm starting to feel uber-guilty about not accomplishing more clean-hippie goals for the year. But, there's always next year :)

I'm getting near the end of my Costco pack of Dove bar soap, and each of my deodorants (am I the only one who has three open at any given time, in three different locations?). So I'm starting to consider the replacements.

At some point, I had found a really interested deodorant paste recipe. Of course, I can't find it now. And I used to use a liquid baking soda mixture, which I gave up. But I found a nice little summary post at the Green Phone Booth about several recipes, and I'm intrigued by Jenn's all-powder mix. I always have all of the ingredients at home (hmmm... I assume my BS is aluminum-free...), which is the biggest bonus of all. First-run testing to come soon (can't say for sure until it makes it through summer :-P)!

As for soap, there are so many out there that say they are "natural" that I really feel I need to do more research. Everyone keeps recommending Lush, but I'm not really a heavily-scented-soap person and the main thing I hear is "it smells so good!". And they are just so damned expensive!

Hair, I'm still working on. I tried one solution, which was highly amusing and deserves a post of it's own (and only worked somewhat). I'm testing another and will update shortly.

Household cleaning products haven't come up again recently, mostly because we haven't been keeping up with cleaning :-P  However, our post-holiday winter project involves a hell of a lot of cleaning (basement *TACKLE*) but that might just be more trash bags and vaccuming, so who knows.

One last thing, we have a HUGE aloe plant which I am considering harvesting entirely to give room to grow one of the new babies (still owe the other one to a friend). I think I can jar and/or freeze the aloe for later use, but I need to look into that more. Would be a good ingredient for other personal care products too, so we'll see if I can harvest it for future use!
Any last-minute projects you're trying to get done before 2011 is completely gone?

Much Love,
Able-Bodied Girl


Thursday, October 13, 2011

caving in

I'll admit it. I used shampoo this week. First time since March.... :(

I've been having a problem with flakes. And with a busy life. And I couldn't figure out what the problem was. Washing too much? Not enough? Vinegar balance? Baking Soda balance? Too much grooming? Hair not drying fast enough? Seasonal issue?

In any case, enough was enough and they weren't going away and I thought maybe, just maybe the soap would magically whisk it out of my hair and magically fix my scalp in that way better-living-through-chemistry and don't-mind-the-side-effects sort of way. And anyway, I had to get to work.

Part of me thought, I'm going to regret this. And part of me said, This better not work toooo well.


In the end, it was a balance. It did help get the flake build-up out. But it didn't solve the scalp problem. So my approach going forward is this:

  • wash as little as possible (I was definitely washing more often than my original twice-per-week I had enjoyed)
  • wash it according to the optimal instructions and proportions I found earlier in the year (I had been fudging it)
  • stop looking at/touching/worrying about my scalp (I swear it knows)
  • wear my hair back less (I had started pulling it back more often, to hide the flakes, but that gives me a headache by the end of the day and I wonder if the pulling doesn't add to the scalp stress)

Otherwise, to be honest, I'm pretty damn proud that I've gone this long with only that one little lapse (and only shampoo, not conditioner). And I probably don't have any more/less flakes than before, which is a little disappointing, but I'm taking the long view on this and hope that everything works out in the end. I'm not opposed to "natural" shampoos, but I'll come to that if this ends in the experiment category, rather than the lifestyle change category.


Look at me, blogging! Sadly, my blog-reading time has gone down. What have you been blogging lately? Will you comment with a link to a favorite post of yours lately, for me to read?

Much Love,
Able-Bodied Girl


Monday, August 1, 2011

w/mo2h #3: no-poo, four months later

So, I started this No-Poo experiement in March, and I've got this penultimate report...


Everyone's skin/hair chemistry is a little bit different... oily, dry, etc. So I figured out that my flakiness could be combated with the ACV on the scalp rather than the BS. So I switched it up... ACV on the scalp for a minute, with scrubbing part of the time. Then rinse. Then do the longer portion of my hair with some of the BS massaged in (it's slimy, so it helps condition too!). Rinse and complete!

I have far less flakes, although I'm normally a little flakey. I'm trying to vary the length of time, amount of scrubbing, and the proportion of ACV to water to see if I can reduce them even more. But otherwise, I'm happy with the results and sticking with it! No chemicals for me, yay!

What's become a habit in your life that seemed so far-fetched at first?

Much Love,
Able-Bodied Girl


Wednesday, June 1, 2011

tuesday's haul

The first CSA pickup. And boy, was I unprepared.

Most CSA's I had seen pre-packaged all the loose greens for you.

Not ours. Cuz I didn't pay attention.

So my one huge canvas bag ended up being a layered mess of spinach and spring greens and arugula interspersed with the whole/bundled goods. As such, I did not pick much of the PYO because I was worried it would get lost in the bag. I also didn't take photos of the haul cuz quite frankly, I had "a day" and was nearly in tears separating everything out of the bag at home. You try telling 3+ lbs of leaves to not co-mingle!!

first haul:
   spinach (2lbs)
   spring greens (1lb)
   arugula (~1/4 lb)
   bok choi (1 head)
   scallions (1 bunch)
   radishes (1 bunch)
   white beets (1 bunch)
   kale (28 stalks)
   butter lettuce (1 head)
pick your own:
   garlic chives
   thyme
   marjoram
   chamomile
   sage
   basil
   parsley
First meal:
Spinach (sauteed in oil, honey, garlic, smoked paprika, aleppo pepper, and balsamic vinegar)
with fish sticks (don't ask)


Second meal:
(cooked/shared with with our CSA buddy, Purple Pregger Monkey)


Bok Choi (blanched, with stir-fried garlic, hot peppers, & CSA scallions, with coconut lime dressing)

Lettuce Wraps (filled with chicken thighs, mushrooms, CSA scallions, and other asian ingredients)


The only bad thing about the CSA, that I can come up with so far, is that I have absolutely NO motivation to do my own gardening again, ever :) With such selection, grown by experts, and keeping me out of the heat...

Why didn't I do this sooner!?

Much Love,
Able-Bodied Girl


Tuesday, May 3, 2011

greening up your girly times

Seriously guys, this is girl talk... best be moving on...

3....

2....

1....

I have found a fabulous, low-cost, minimal environmental-impact way of handling my menstrual cycle.

If you have never heard of the Diva Cup, or Moon Cup in the UK, let me educate you. The Cup is a silicone, reusable cup that you insert much like a tampon. About every 12 hours (more-frequently if you're having a heavy month), remove, empty, rinse/wash, and re-insert. After each cycle, give it a boil. No monthly run to the drugstore, no more flushing tampons down the toilet, no wrapping soiled pads.


For anyone who has never used one, you probably have a lot of questions... is it messy? will it fit me? what can I do or not do while wearing it? how do I handle using one in a public restroom stall? what about health concerns? Trust me, you are not the only ones who have had these questions. Diva Cup's website has a fabulous FAQ that answers just about every question you might have, so I do recommend reading up to get your specific questions answered.

In the meantime, I'll give you the practical bits of info to help you get started... don't be squeamish, cuz I'll get descriptive.

Is it messy? Number one concern. Ever.
There will be an adjustment period as you get used to the proper insertion technique (ie, you might have some leakage to deal with). So don't throw away those panty liners just yet... you'll want to have them as a back-up for the first few cycles.
When inserting the cup, there is usually very little messiness involve. Of course, always wash your hands after, but it's not bad otherwise.
When removing the cup, I find it's best to do while actually seated (just slide back a bit on the seat) so you can remove and dump without risking drips elsewhere in the bathroom; use a piece of tissue to set it aside for the rinse/wash. Clean yourself, do your business, etc. Then wash your cup and re-insert while wet. Doing all this in a shower is certainly feasible too.
As for changing the cup in a public restroom stall, while camping, etc... on those very few occasions I ever actually have to deal with that, I carry a small pack of toddler wipes with me; they are moist and flushable (please note that Diva does not recommend "pre-moistened wipes" on their website, as they may damage silicone, and some parents complain that "flushable wipes" are not very flushable... so take my advice at your own risk!). I remove and dump, then wipe it off with the wipes. I hold it in one hand while cleaning myself. Then I reinsert and use another wipe or two to clean my hands. Another wipe on the seat (hell, before too) if necessary. Do a courtesy flush mid-way if you're worried all those wipes will clog the toilet!
As their website says, changing more frequently than 12 hours is a personal, flow-related decision. I find that for 95% of my cycles, I am near a private restroom during those two times a day I remove and clean the cup, thus having more flexibility to set the cup down and rinse off in a sink (clean up behind yourself!). That other 5% of the time, prepare with wipes, or bring those few leftover tampons you have to get through.

Is it hard to insert? Will it fit me?
There are two sizes, mainly based on age and whether or not you've birthed children. I've never heard of anyone having terrible difficulty with the size that the company recommends.
As for insertion, it is similar to inserting a tampon, in terms of angling toward the tailbone. You'll want to fold the cup, much like how your tongue looks when you hot-dog it. A pinch along the side will help keep that fold, and then you can use the bottom of the curve to slide up and in. There is a stem which you can use to help push it in a bit further until it is comfortable. I find that the fold does not immediately pop open, so a few minutes later I'll feel a little butterfly as the cup fully opens. If the stem is too long, you can trim it, but keep in mind that it is your primary grip for removal, so you'll want it to be long enough to grab.
If it's not in far enough, you will know... you'll feel the base of the cup (not to mention the pokey stem) when you sit. No worries, just push it in a bit more. And if it's in too far, it'll be hard to get hold of. But from my experience it's really hard to get it in so far that you can't get it out.
It does take getting used to, and there may be some leakage if it doesn't settle in correctly. But it is fairly easy to get the hang of and there is nothing saying you can't practice during other times of the month!

How/how often do you clean it?
During the cycle, rinse or wipe during each removal/insertion. You can use mild soaps, but nothing harsh or abrasive to silicone. Please reference the list in the Diva FAQ's of cleansers they do not recommend. (Note they do NOT recommend using pre-moistened wipes; I believe there is a difference between pre-moistened towelettes and the toddler wipes and feel comfortable using the toddler wipes as infrequently as I do.) They also sell a cleaner of their own.
There are tiny holes along the rim that allow for air flow. These need to be kept clear, so keep a toothpick handy for that if necessary. I normally check thoroughly between cycles, unless I have a particularly heavy cycle or see a problem on a visual check. To check for certain if they are clogged: fill the cup with water, top it with your palm to seal it, flip it over, and gently squeeze. If the water comes out of the holes, they are clear. If not, break out your toothpick.
After each cycle, boil it for 5-10 minutes to completely sterilize it.
You may find some discoloration over time, but the boiling and a gentle scrubbing with an old toothbrush (for this purpose only!) will help remove any residue.


Other than that, there's not much to it. New things are always a little scary, but I've been using the cup for 6-7 years now and have been very very happy with it!

For those that use the cup, do you have any other suggestions/advice? And now that the boys have left the room, are there any other topics or questions you ladies want to pose to the room?

Much Love,
Able-Bodied Girl


Friday, April 1, 2011

w/m02h #3: my shampoo-less month

Ok, it's nearly been a month since I stopped using shampoo. And, no, I'm not gross :)

There were plenty of occasions for adjustment. A 6-day vacation in Florida was a chaotic, greasy, flaky time. But I managed to pull through, figure out what my hair didn't like, and moved on with my life.

I'm still only washing my hair on Mondays and Thursdays. But I'm no longer trying to add oil to my hair; I'll just brush it more to distribute the scalp oils.

I started noticing that flakes were coming back and, after reading a bit of advice in this LJ community (which is very helpful if you're starting out and are looking for solutions for your particular hair type or issue), I decided to try a few things:
  • I'm using a more-diluted baking soda mixture, but I can't really say how diluted... I add water to the bottle during my next washing if the previous washing seemed to have left me with baking soda residue/flakes.
  • I scrub my scalp with my nails pretty furiously when the residue/flakes first appeared, to see if it was just all sorts of chemical grossness coming loose from years on shampoo, or even just dead skin cells. This has really worked the best of all; granted, I had a nightmare day in Florida after the first scrubbing when I looked like I had decended upon them with snow. But that's what a ponytail is for. After that, though, there has been less and less, and I have to spend less and less effort with the scrubbing to maintain a minimal level of flake.
  • I also spend 5-minutes to blow dry (on warm, then cool) my roots; I was thinking that some of the residue/flakes were due to a wet scalp all morning, in combination with too much baking soda. Plus, the blowing might blow some of the flakes out? As I dilute the baking soda more, I'll try drying less. I just hate wasting the energy blow-drying when I have at least another hour before I am in public, and no-fuss no-primping straight hair.
Ok, so for those of you reading all this and considering (or not really considering) going without your coveted shampoo and conditioner, and thinking OMG this sounds like a pain in the ass to do; I could just suds up with some Tresemme... (shit, nobody thinks "OMG" do they?)........

You're right. It's been a bit of a pain in the ass. Everyone's hair is different and your scalp and hair will have to go through their own personal adventure. But, I love a good challenge and this has been a money-, time-, health-, and environment- saving journey so far. And that, in my book, is a WIN. Also, had I not found the little well-sealed bottles that I had found to transport the BS/V in, I could have just rummaged all the ingredients from the houses of those we visited :)


What fun challenges have you encountered lately? Any April Fools' jokes today?

Much Love,
Able-Bodied Girl


Monday, March 14, 2011

w/mo2h #3: no poo, week one

Well, I talked about going no-poo, and I did eventually start out pretty well! So, what's the state of the hair now? What about those little hiccups I was having?


Baking Soda crystallization: my Girl-Science (a mix of real science and phenomenology-style observation) has decided that the water could not dissolve all that baking soda in the 6:1 ratio. So, I changed my method.
Boil your six parts water (microwave would probably work, but I did it on the stove). Take it off the heat, pour into a heat-safe bowl, and add the 1 part baking soda. Mix around until most/all has dissolved. Then let it sit and cool completely. Some crystallization will occur on the bottom; do not mess with it! Pour off the liquid into your bottle, and then top off with a little extra water. Viola! You've only got as much baking soda as the water will handle.
How often? I washed it Sunday, Monday, and Tuesday last week... overkill! So, here's what happened. Monday, I accidentally-on-purpose (one of those momentary instances of stupidity) put oil in my hair, oily hands to dry hair. Ewwww greasy grossness! So I had to start over on Tuesday. Then I held off until Thursday morning (through 2 morning workouts and a yoga class). I did it again this morning. I haven't found that my hair gets gross in the least from the waiting. So I think I'll stick with my Monday-Thursday schedule, unless circumstance dictates otherwise.

The difference in hair? I found on Tuesday and Thursday mornings that my hair was pretty dry after I let it air-dry (despite that residual oil from my hands during my shower). Like, static the instant I brushed it. Soooo, this morning in the shower I applied a bit of oil (1/2 tsp?) directly to my wet hands and then onto my very wet hair, rubbed it throughout (but not too close to the scalp), and followed that up with a post-shower hair rub with a towel. And that seems to have helped quite a bit today.

Other experiments in technique: To combat the dryness and harshness of the baking soda, I may experiment with vinegar-only for my Monday wash, or adding more water to the bs mixture to dilute it further.

A hurdle to the routine: We head out on a mini-cation on Thursday morning, and I'm not sure how/if to transport my new hair products. I have always found travel bottles to be unreliably leaky.  So I guess I have two days to figure that out. With the possibility of swimming and the salty air (which I hate the feeling of in my hair), I will probably at least want my Monday wash.

Overall, I am very very happy with this switch. Not only for the lack-o-chem in my hair, but the fact that it's really not taking much effort at all. In fact, it takes less time and less money to do this than the traditional way. Go figure!


So, is anyone else contemplating this change?

Much Love,
Able-Bodied Girl


Tuesday, March 8, 2011

w/mo2h #3: no-poo, day one

I mentioned that I was going no-poo, and the time has come...

Last week I picked up two little BPA-free plastic water jugs from the dollar store. Saturday, I didn't wash my hair after our first bike ride of the year, just to get those natural oils going strong. Sunday morning, I simmered up the baking soda mixture, and put both mixtures in their respective jugs. I also added some scent to the vinegar mixture.

FYI, I am not doing before/after pictures cuz, really, how can you capture what we're doing here in photographs? I mean, unless my hair is suddenly curly, the changes are going to be subtle but easily describable. I hope :) I hope a photo of my bottles will suffice!


Anyway, I jumped in the shower after dinner on Sunday (and again after my Monday morning work-out!), so here's the scoop...

The baking soda boil? I think I did it wrong. My baking soda got a little crystalized, so I put it back in the pot to reboil. That seemed to do the trick... just heat it up until all the baking soda bits all fizzle out.

The application? Well, it's not thick, so I found that flipping your hair over and splashing the bottle over works pretty well. Since the water is cool compared to the shower, you can really tell if the baking soda is reaching all scalp areas. For the vinegar, I again flip, and splash the hair I cradle in my free hand.

The baking soda wait? I'm so used to letting the conditioner sit that it's hard for me to let step one sit in my hair. So, that didn't really happen. But I'll try to adjust to the change in routine to see if it makes a difference.

That petroleum-slick feeling? You know the one. the conditioner makes your hair feel wet and silky and glossy while you're in the shower. Your hands run through your hair easily. It feels wonderful. Sorry, that's GONE. What you have is wet hair, not the flowing-behind-you-while-you-swim-underwater kind. More like the just-went-swimming-in-the-creek-with-the-fish feeling. I was very worried about my 12 inches of hair being a tangled mess.

A moisture-boost? I use almond oil - post-shower pre-dry-off - so I just ran the residuals from my hands through my hair. I figured it couldn't hurt, and if my hair was too greasy I'd stop doing it.

The air-drying? I don't blow dry. I wrap my head in the towel after I blot any remaining water off my body. I left it wrapped up for a couple minutes, then let it down, rubbed it with the towel a bit, and let it go. (Ok, not really "let it go"; more like "constantly and obsessively touched it"). Turns out, not any more/less tangly than with conditioner!

Overall, I'm pretty pleased so far! More updates as time goes on...

So, who's gonna try this after it's a big success for me??

Much Love,
Able-Bodied Girl


Tuesday, February 15, 2011

the healing miracle of aloe

During my small soiree on Saturday, I burned myself. Really badly. I'm normally pretty tolerant, but I was nearly in tears with the searing pain.

From First Aid certifications, I remembered that it's best to run a burn under warmish water... not to cold and not too hot, so I did so for about 30 seconds.

Then I grabbed the exacto-knife and lobbed off the tip of one of my aloe leaves.

Now, this little aloe plant has come a long way. Able-Bodied Boy's mom gave it to us a year or so ago. It sits on the kitchen window sill, just begging for me to kill it. But I haven't. We water it every week or so and it has already produced two babies (I had no idea they sprouted new shoots!): one went to Awesome Boss Lady; the other sat on the sill in it's own container, produced two more babies of it's own, and finally went home with Beth, Girl Explorer. The momma aloe looks a little worse for wear. She's sacrificed appendages for sunburns and crock-pot spill-overs and other minor 1st degree burns. But this was her first 2nd degree burn.

So, I lobbed off a small bit, split it open, and smeared it gently on the top pad of my ring finger. Oh the pain!!! Able-Bodied Boy got me a bandage, which he tried to apply to my finger. The pain was too much for me, so I took over, trying not to put any pressure on the finger tip.

The first aloe miracle was the end of the pain, in less than an hour. No pain. What. so. ever. I took off the bandage and fascinated myself with the painless blister. This is nifty!

Before bed, I smeared a ton more aloe on the finger and on a bandage and applied the bandage. A little bit smelly, but I knew it would help a bit.

The second aloe miracle was discovered the next morning. Still no pain, and the edges of the burn were already healing. The blister had already reduced in size by about 15%.

At this point, I stopped applying aloe.

The third aloe miracle happened yesterday, when I visibly noticed the blister reducing in size all day. And this morning, when the blister was gone entirely. The skin is still slightly red and papery, but still...

Two and a half days, from 2nd degree burn to just a slight red mark. Aloe rocks my world. And my finger.

I'll probably try more sprouting in the spring, when momma will get more light and more consistent temperatures.


Do you grow any fabulous healing plants? What plant, and how does it help?

Much Love,
Able-Bodied Girl


Sunday, February 6, 2011

w/mo2h #3: when the bottle runs low...

 
No, we're not talking a wine-bottle crisis.


We're talking shampoo bottle.


Have you ever read the ingredients on your shampoo or conditioner? It's sort of scary, but you've been using shampoo since your parents started throwing you in the bathtub and it just seems, well, normal. You've never heard the news say "Shampoo has been directly linked to cancer!" or alzheimers, or autism, or birth defects. So, even if those ingredients look a bit daunting, why would you ever stop using it?

For me, the main point is fear of the unknown, unregulated corporate world. Personal care products aren't highly regulated, so they can make up whatever they want about a hydrolyzing moisturizer protien called Hair-rifficizer, and consumers will nod and feel satisfied when their hair is clean and shiny. Great. I don't really know what all these things are, but I know some are petrochemical-based and that doesn't satisfy me, no matter how shiny my hair gets (mmmm shiny like Gulf birds!). And I don't really trust some corporate marketer to tell me what's good for my hair.

And other considerations include the product packaging (plastics, aka unsustainable oil consumption), the cost of traditional shampoos and conditioners (the alternative below is cheaper!), natural living (my hair actually likes to go a couple days between washes, and your scalp can adjust it's oil production according to your washing habits... less oil if you wash it out less, more if you wash more frequently), and ultimately, the X factor (unknown chemicals and toxins on my body, which Melinda of of One Green Generation writes about here and you can learn more about with any of these links).


So, if I could find an alternative that's not any more expensive, and does what it's supposed to do (take away dirt) without ruining my hair (too oily, too dry), I'd be ok with that. Would you?


As my shampoo bottle runs low and I contemplate what to use next, I've found an alternative I'm willing to try: the No-Poo method. It uses just baking soda (for the scalp) and vinegar (for the hair) as cleansers. You can also add essential oils to mask the vinegar smell and create your own fresh scent!

From all I've read, it seems that it works for many, but not all hair types. But until you detox your hair of all the crazy stuff it's been fed for so long, you won't know what your natural hair type is. I've seen users whose hair has changed in it's dry/oily factor, straight/curly, and in shine. I know my hair is shinier and healthier after a day without shampoo.


Based on techniques from Melinda of One Green Generation and from Erin aka the Conscious Shopper, I'm going to try this:

1. Boil 1 part baking soda to 6 parts water. Cool and put in a squeeze bottle.
2. Mix 1 part vinegar (apple cider or white) with 6 parts water, adding an essential oil or whole spices if desired. Put in a second squeeze bottle.

3. Massage a bit of the baking soda solution into the scalp, leave for a couple minutes, then rinse.

4. Work a bit of the vinegar solution through the hair, then rinse a few moments later.

5. Crystal, the Thrifty Momma, also uses a coconut oil as a moisturizer. Just a tiny bit, she says! I'll only use it if my hair seems to get very dry.

I'm really excited to try this soon, as soon as my shampoo runs out, which should be soon. The conditioner is a bit more full, but Able-Bodied Boyfriend steals bits of that now & then and probably wouldn't mind if it stayed in the shower :)


Does anyone wish to join me in this trial run?? I have a collection of scented oils, if you want to bring some bottles over and make our first batch together!

Much Love,
Able-Bodied Girl


Sunday, January 16, 2011

w/mo2h #2: go bacteria go!

Over the holiday vacation at my parents home, I decided to try my hand at yogurt.  Specifically, Greek yogurt.

Yogurt has traditionally been a diet food of choice.  Full of protein, low on calories, high in the good aspects of dairy, and full of bacteria that aid in digestion.  Plus, it's yummy tangy flavor is a nice replacement for mayo in a number of applications; a friend recently recommended using it in place of mayo in tuna salad, and I have used it in Waldorf salad too.

So, I had purchased "Make it Fast, Cook it Slow" by Stephanie O'Dea last year, after enjoying her blog.  She included a slow-cooker yogurt recipe which seemed easy enough... heat the milk, cool the milk, add a little yogurt, and let it go for a half-day.  She offered some options for flavor and thickness, and I roamed about the web looking for other suggestions and additional information on making greek yogurt.

Greek yogurt is a thicker, more protein-laden version of regular yogurt containing less carbs, sugars and sodium.  I also learned that greek yogurt is just regular yogurt that is drained of more of it's whey.  So technically, you could save money and time by just buying plain yogurt and straining at home.  Which, I may very well do on busy weeks.  However, I really wanted to do it myself, start to finish (ok, not really start to finish.  The milk is store-bought, as I don't have access to a cow, nor do I have a source of unpasteurized farm-fresh milk).

Ultimately, I followed a simple plan:


SLOW-COOKER YOGURT (REGULAR OR GREEK)

You need:
  • milk (fat free or whole or anything between)
  • plain live active culture yogurt
  • slow-cooker
  • colander
  • fine strainer (read notes below)
  • about a day of time

Proportions and Yields:
One gallon of milk plus one cup yogurt =
                      ~3 quarts regular yogurt or ~2 quarts greek-style yogurt plus one cup reserve
2 quarts of milk plus 1/2 cup yogurt =
                      ~1.5 quarts regular yogurt or ~1 quart greek-style yogurt plus one-half cup reserve

Instructions:

1.  Put the milk into a slow-cooker and turn on high.  Monitor until it reaches 180F (a digital thermometer helps!).  From what I've read, this is just to kill any bacteria in the milk.  This takes 2-3 hours, depending on how much milk you use

2.  After reaching 180F, turn off the slow-cooker, remove the crock, and let the milk cool to 110-115F.  Any hotter, and the heat will kill your yogurt bacteria.  Again, this took an hour or so; less time if you stick it out on a cold porch with a splash screen on top to keep out errant bugs.  If you get a film at the top, do please take it off.  Not good eats.

3.  After reaching 110-115F, scoop out some milk and whisk it with the live, active culture plain yogurt.  Dump it all back in and stir it up.


4.  For the next 6 hours, keep the crock warm.  I kept the crock warm in front of the fireplace at my parent's house, Stephanie O'Dea recommended wrapping your crock in a bath towel, and I used a soft-side cooler at home.  The amount of time will vary, but keeping it above 70deg will help the bacteria grow.


5.  You end up with what looks amazingly like... yogurt.  Soft but gel-like.  Some whey may have started to separate.  This is normal!


6.  The next step  involves straining to the desired thickness by draining out the whey.  There are a number of different ways to do this, all of which will involve a colander and something with a finer strain laying in it; this could be an old (clean) t-shirt, a layer of coffee filters, cheesecloth, or - my personal choice - a paint-strainer bag.  I like paint-strainer bags for a number of reasons (thanks, Able-Bodied Boyfriend, for the suggestion!).  First, it's cheap.  You can find them for just a couple of dollars in a paint store, and we have one just down the street from us, conveniently enough.  Second, they are vastly reusable.  Throw them in the wash if they get crusted with food chunks, or simply rinse with a bit of soapy water after straining yogurt.


7.  So, armed with your colander lined with some sort of fine strainer, scoop/pour the yogurt in and let it sit.  I noticed that I first got some of the yogurt itself draining out the bottom, but that soon led to a pure, yellow-ish whey.  For the first few hours, I let it sit out at room temperature.  Partly to cool down, partly to allow the bacteria to continue growing, partly as a visual reminder to perform step 8...
8.  After a few hours, scrape the inside of the paint strainer to release some of the thicker yogurt and allow the looser stuff to drain.  I also poured out the whey on occasion, from the catcher vessel.  At this point, it would have been fabulous normal yogurt.  But I covered it and put it in the fridge overnight, ~8 hours.  That was the perfect amount of time.  On one occasion, I left it to strain for more than about 15 hours... whoa boy, it was like spackle.  But you may like it that thick...
9.  You have greek-style yogurt!  Scrape out as much as you can.  This may get messy, but you can just lick your arms.  Or the counter.  Maybe not the floor.
10.  Remember to reserve 1/2 to 1 full cup as the starter for your next batch.  I put it in a jar that holds about twice as much as I needed.  Next batch, I put my warm milk in the jar with it and shook it like a polaroid for a couple minutes.  Worked like a charm, and less mess/dishes!


Yield: 2 quarts greek-style yogurt + 1 cup reserve yogurt + a minor mess


Which dish(es) do you like to make from scratch?  Did you learn how for yourself, or is this something passed down from older generations?

Much love,
Able-Bodied Girl